Table of Contents
WMI Provider Host High Disk Usage on Windows 10
If you are using Windows 8 / 10 then, You may be entirely in trouble that What is WMI and Why this process or WmiPrvSE takes high usage of CPU.WMI stands for Windows Management Incrementation. In this, we are going to tell everything about WMI and also the solution to its high usage of CPU. So Stay Tuned!

What is the WMI Provider Host?
WMI stands for Windows Management Instrumentation(WMI). It is a set of some Specifications to strengthen the management of the application in a network provided by Microsoft. It includes information about the local or remote computer system to the users.
WMI Provider Host or WmiPrvSE process is a Windows Host Management Process, used by the developers for monitoring. It is a valuable service that some of the application cannot run without it. If you stop this process, then some of the features or services of your computer may become useless, and the bad thing is you will even not get any error notification regarding this.
This feature is mainly useful for the enterprise that can centrally manage the computers Because this information is requested with the help of scripts. Whereas on a local or a home PC, some of the software that you have installed also may ask or request some of the information about the system through the Interface of WMI.
Although you can also use WMI by yourself to find the several types of information that are typically not known in the windows information such as to know the serial number of your PC, find the model number of the motherboard or to see the status of the hard drive.
Several Services provided By WMI
It also supports some configuration such as security setting, changing or setting some system properties, Setting and changing the permissions for authorized users, scheduling of the processes at the particular time, enable or disable the error logging, to assign or change the drive label, Backing up the repository of the object and many more.
Why is WMI using High CPU Usage?
Usually, WMI Host Provider doesn’t use much usage of the CPU. It will use the CPU when any software or script that asks for some information via WMI. High usage of the CPU is just the sign that another software is seeking for some information or Requesting any data via WMI.
However, the high usage of the CPU for a long time for WMI is an indication that something is wrong because WMI Provider Host doesn’t occupy the resources of the CPU for a long time.
So you have to fix the error by following some of the steps that are below.
How Do You can Fix the Problem On WMI Provider Host High CPU Usage?
Solution-1: Restart the WMI Provider Host Service on Windows 10
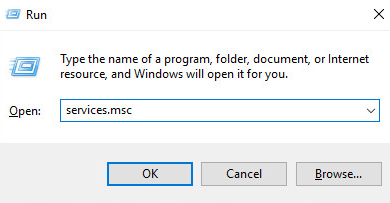
- Hold the Windows key + R to launch the Run command, then type Services.msc and press the Enter.
- Now, Scroll down all the services and find Windows Management Instrumentation and then click on the Restart.
- Now, Reboot Your computer and check whether the same error is there or not. If it is still there, then you should restart the other WMI Provider Host related service as given below.
Solution-2: Restart other WMI provider Host related Services
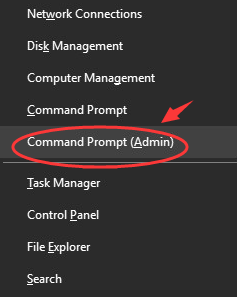
- Type cmd.exe in the search option and open the Command Prompt and then choose Run as administrator Or Press Windows key + X at the same time and select Command Prompt(Admin).
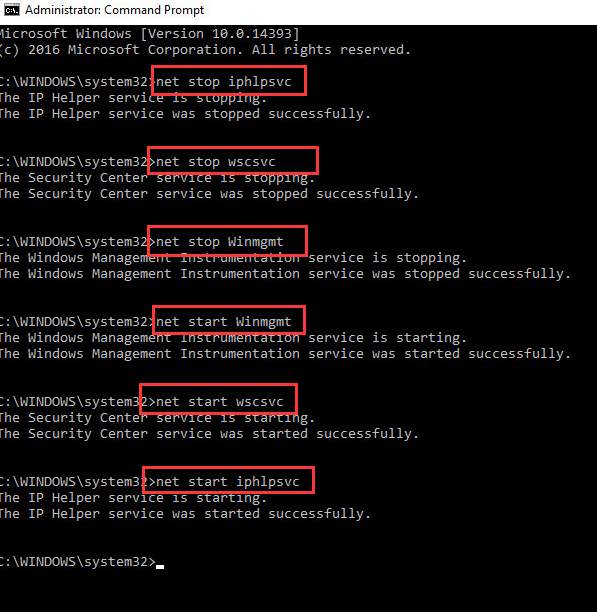
- Now, in the Command Prompt Window Type the following command step by step as given below and press the Enter after each command.
net stop iphlpsvc
net stop wscsvc
net stop Winmgmt
net start Winmgmt
net start wscsvc
net start iphlpsvc
- Now, Restart your computer and check if the WmiPrvSE high CPU usage and WMI provider Host error is still there or not.
Solution-3: Run Virus Scan on Your Computer
In Many cases, the actual reason behind the slow performance of the PC also can be any Virus or malware. If it is so then, you need to run the antivirus program or software on your computer to fix this error.
If your computer found any unwanted programs or application that may contain the virus then, Remove those files from your computer and then Restart your computer.
Solution-4: Uninstall the Components and Drivers that causes the Problem
Sometimes the Faulty Components or Drivers also generate this error. So better to Remove that.
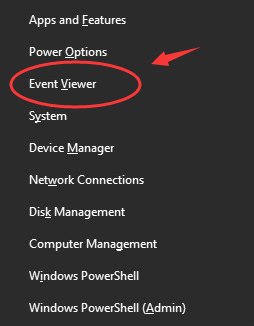
- Press Windows logo Key + X Simultaneously and Open Event Viewer.
- Now, Click on the View Button that appears on the top of the Menu and then click on Show Analytic and Debug Logs.
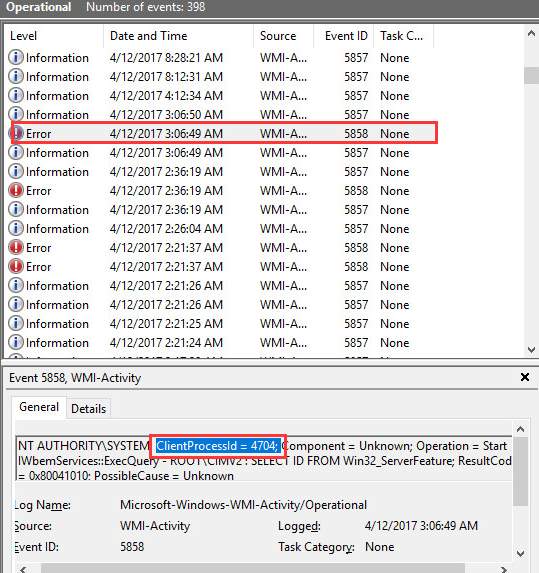
- On the left panel of your PC, Navigate to this path Applications and Service Logs > Microsoft > Windows > WMI Activity > Operational log. Now Mark or Note down the Item that listed as an Error.
- After this Procedure, Press the Windows Logo Key + X simultaneously, then select Task Manager.
- Now, click on the “Service” tab and Find the processes with the Matching IDs as seen in “Event Viewer” in the column of PID when You Locate or Find these Process then “Uninstall” or “Disable” those service.
That’s All!
It is very important that you should download or install the Drivers from the Trust-worthy sources only.
RELATED: Windows Modules Installer Worker High Disk Usage Error
Solution-5: Boot your PC Into Safe Mode with Networking
You can Troubleshoot your Computer into the safe mode can help you to find the error in your PC. To do safe booting follow the below steps:
- Press Window Logo Key + R simultaneously then, Type msconfig in that search box and press Enter.
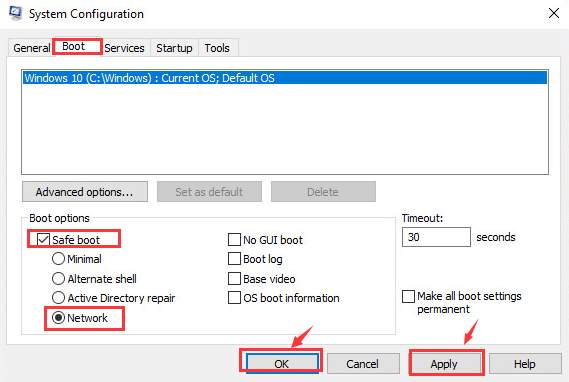
- Now, Go to Boot tab, then Tick the checkbox for Safe boot and select the radio button of the Network option. Now click ”Apply” and “OK” to save the changes.
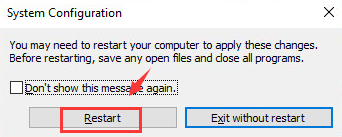
- Now, Ensure that All the Files or Data on your Computer is saved then click Restart to enter safe mode.
- When you are in safe mode then, Press the Windows Logo key + R simultaneously, then select Windows PowerShell (Admin).
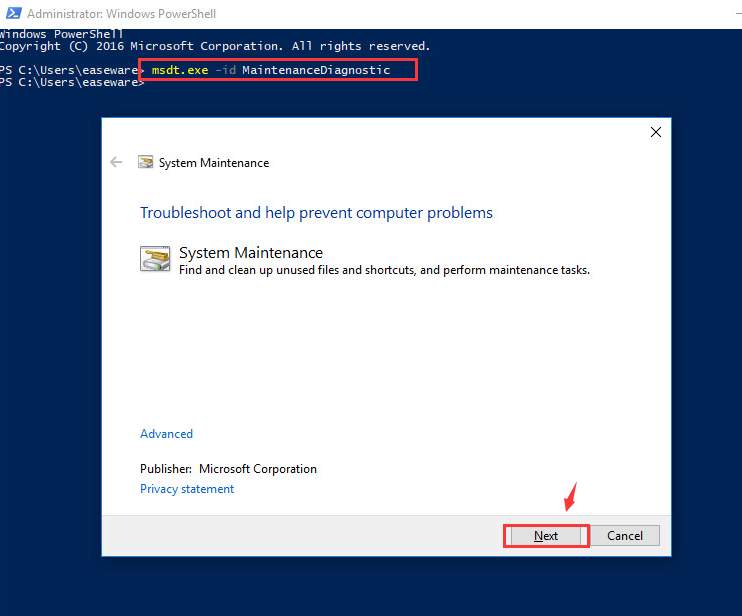
- Then, type the following command in it and press Enter.
msdt.exe -id MaintenanceDiagnostic - After entering this, you will see one troubleshooting window pop up then click “Next” to run the troubleshooting. If this troubleshooter detects any problem in your System, then follow the instruction to get it repaired.
- now, Again in the PowerShell Window, type the following command and Press Enter
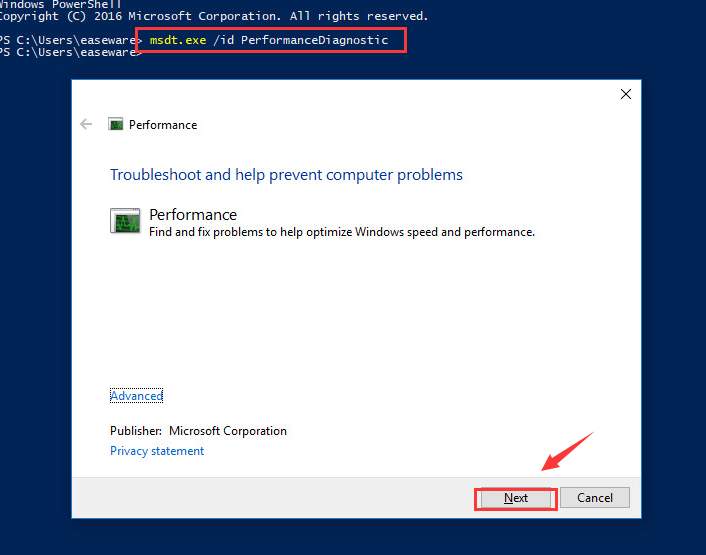
msdt.exe /id PerformanceDiagnostic
Afterwards, you will see the Window Popup of Performance troubleshooting then click “Next” to continue the troubleshooting. - After finishing these all the procedure if you see any notification which says that “Something needs to be changed in your System” then do as the System says to you.
- After completion of the troubleshooting process, You need to boot the computer into the normal mode. To do that, Repeat Step-1 and Go to the Boot tab and “Empty the checkbox of Safe boot”. Then click Apply and Save OK. Now Restart your Computer into Normal Mode.
Frequently Asked Questions:
-
What does WMI Sevice do?
Windows Management Instrumentation(WMI) consists of a lot of extensions to the Windows Driver Model, which provides an operating system interface through which the component gives us the notifications.
-
Can I Stop WMI Provider Host?
YES, You can stop the services of the WMI Provider Host. It will help you to fix the problem of Wmi Provider Host High CPU usage in your Computer. If You want to Stop or Restart the service, then you can Read that in our article which I have mentioned Above.
-
What does WMI Provider Host Do?
Windows Management Instrumentation(WMI) or WmiPrvSE.exe is an important service. Due to this, the management of some of the application or software becomes more natural. It also helps in the industry for monitoring purpose as well as in-home PC it provides serval configuration such as changing or setting some system properties, Setting and changing the permissions for authorized users and many more.
-
How do I Know if my WMI is Working or Not?
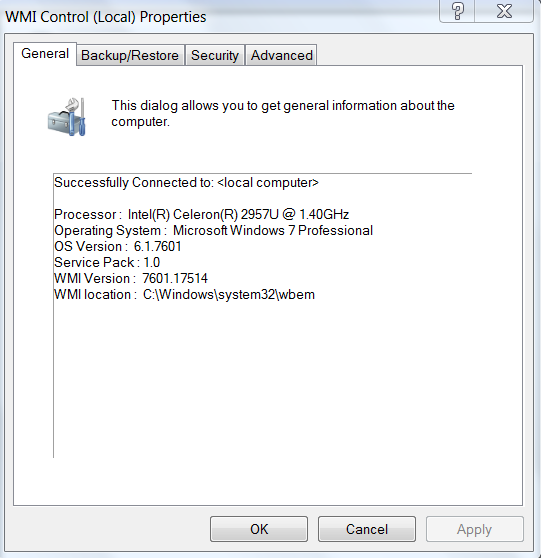
- Click Windows Key + R Simultaneously and type “wmimgmt.msc” then press Enter.
- Now, Right-click on the WMI Control (Local) and Go to the “Properties.”
Now You will see that, If the WMI service is correctly configured, the WMI Control will connect to WMI and display the Properties dialogue box and On the General tab, you will see information about the OS and WMI Version.
Conclusion
So These were the Effective approaches to solve the error of high usage of CPU occupied by Windows Management Instrumentation(WMI). If you are facing this same situation, then we hope that this article could be helpful for you to solve this problem. If you have more Workarounds or any other idea, then Let Us know in the comment section.







Leave a Reply