Table of Contents
Windows Modules Installer Worker High Disk Usage In Windows 10
If you are using Windows 8 or Windows 10 then, You might have observed one thing that Windows Modules Installer Worker, this process is using a large amount of CPU usage. Well If you have the same situation, then we have a solution for it.
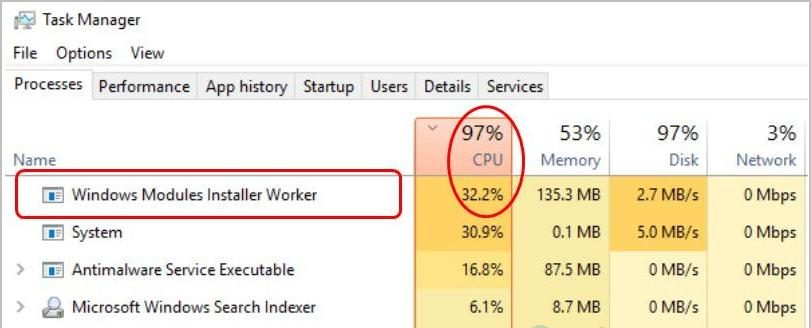
Now, See the image below. Is It Relatable to you? If yes, then you are not the only one who is facing the situation. A lot of users have faced this situation.
But You can fix this by following some of the steps. Here we are going to share about windows module installer worker high disk usage as well as the Windows modules installer windows 8 and windows 10, although the windows modules installer worker 100% CPU occupied memory. So let’s get started!
What is Windows Modules Installer Worker
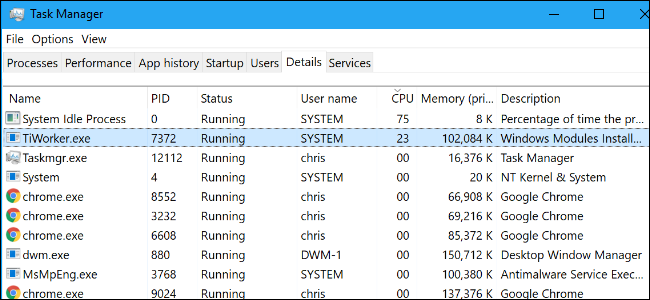
Windows Modules Installer Worker or you can say TiWorker.exe file. It is a Windows Update service that always finds for the new updates or new Installation on your Computer. Here, TiWorker is an essential process for the Windows Update Service. This process starts whenever you power on your computer.
Usually, TiWorker.exe runs on the Background while your PC or System checks for the new updates. Along with that, you can face the situation that your PC Slows Down because while processing the process Your System holds the resources which are needed to them and after completion of the process it will release all the resources. See the below image:
Why Is It Using High CPU?
It often works smoothly and doesn’t occupy many resources of your Computer. But If something went wrong, then it will cause Higher CPU Usage Issues and also may create 100% usage of Disk. To Resolve this you might have to reboot your computer many times, but it can’t be fixed by itself.
You have to go through some of the steps to resolve it. Corrupted Windows update files or Broken files and Incorrectly Installed Files are one of the most common Reasons to generate High CPU Usage error.
Is Windows Modules Installer Worker a Virus?
This process is a part of the Windows OS itself. Till now, There are no reports that generate malware itself as a TiWorker.exe process or, The Windows Modules Installer Worker. So Don’t Worry this is not a virus.
Can You Disable This Automatic Updation on your PC?
YES, You can disable this Windows Modules Installer Worker Service to prevent the high usage of CPU, After Disabling that, This will Prevent Windows from installing its updates. One of the Recommendations is that you should not disable it.
How Do You can Fix the Problem On Windows Modules Installer Worker High CPU Usage?
There are Several Possible Solutions that you can try to fix the problem. You might not have to try all of them. We have found a Solution to it, These methods are Shared by those users who belong to Microsoft Community. It is effective, according to them.
Solution-1: Run System Maintenance & Windows Update Troubleshoot
Suppose If you have changed your Windows Update as Manual and still getting the error of High CPU Usage, then you have to fix this problem then follow the below steps:
- If your computer is running on windows 10, then Press the Window Key or Click on the Windows Icon. Then Enter Troubleshooting in the search box
- Now, In this Window, find the View all option on the left side, click on it to navigate to that page.
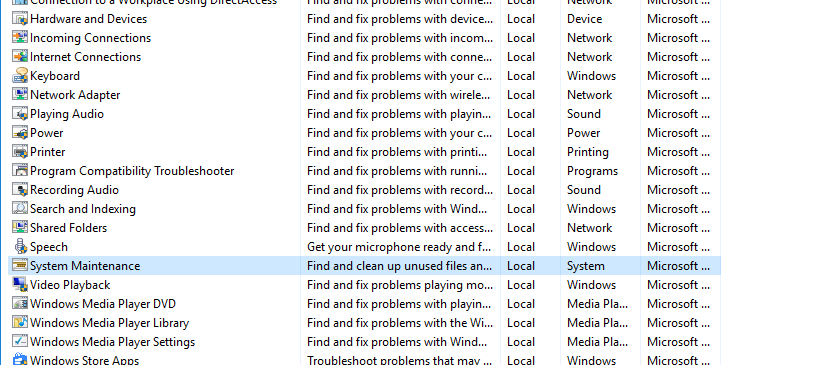
- Find System Maintenance in that new window and click on it. After clicking, that will be started searching for the Issues on your Computer.
- Here, You are done. This process will solve your issue. If it isn’t working then try another method.
Solution-2: Delete Software Distribution Folder
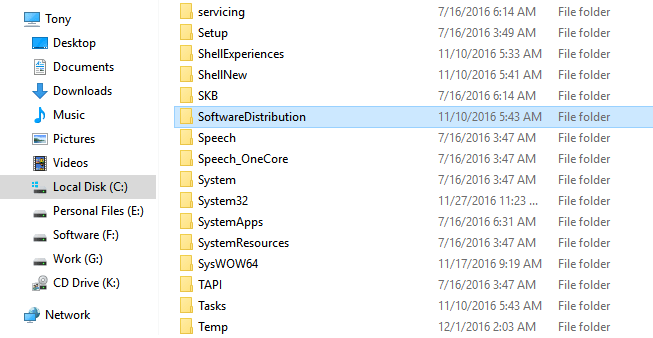
Most Often Windows downloads and stores the update in the Software Distribution Folder for later Installation of the updates.
To access this folder Go: C:\windows\SoftwareDistribution
Several reasons that generate high CPU usage errors or Improper Installation of files can cause such errors. To resolve this, you have to delete the Software Distribution Folder on your PC
If this folder finds as corrupted, then you will face problems during Windows Update. So, Delete all downloaded updates, and it will force Windows to Re-Create a new and empty Software Distribution Folder.
- Press Windows key and R simultaneously.
- Type “misc” in that search box.
- Search Windows Update and stop that, else it may become difficult for you to remove the folder.
- Now, Go to C:\windows and search the Software Distribution folder, and Delete that.
- Afterward, Restart your computer and check for the Windows Update.
Solution-3: Clean Reboot your PC
The simple meaning of clean Reboot PC means You are Restarting all the System Files. It will remove all the Cookies and Junk files from your computer. After clearing this, You can fix the Windows Modules problem by below steps:
- Click the Windows Button Or Press the Windows Key on the Keyboard.
- Type msconfig.exe in the search box. Now, Click the msconfig.
- Now, Check the Normal Startup button and Click OK.
- Afterward, Restart Your Computer. Here you are done.
Solution-4: Disable the Windows Module Installer Worker
Windows 8 or Windows 10 provides the option to either Disable the Windows Modules Installer Worker or not. Meanwhile, this is not Recommendable because It is an Important System file. This is not the perfect method because it prevents any software or important files from updating.
You can fix this problem by downloading “Windows Update” manually rather than Disabling the Windows Modules Installer Worker.
You can Stop the updates of Windows Module Updated Installer from launching this to prevent the background process. To do this, you have to set the meter connection ON to stop the downloads of new Updates from the network connection.
See the below steps:
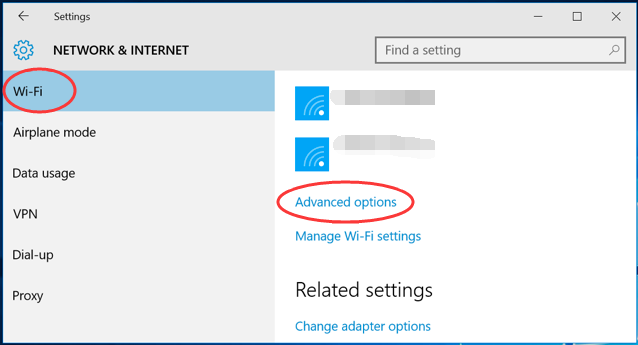
- Go to Start -> Settings -> Network & Internet -> Wi-Fi.Now Click on Advance Options.
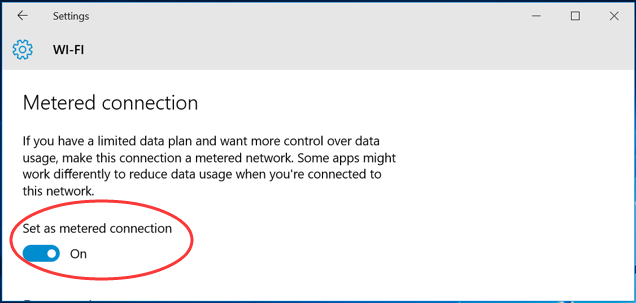
- Now Set ON Set as metered connection.
That’s all. Now check if that error is still there or not. Else try the Recommended Method.
Must Read – WMI Provider Host High CPU Usage Error In Windows 10 error solved!
Solution-5: Change the Windows Update From “Automatically” to “Manual”
By setting Windows Updates “Manual“, All the Windows Updates Won’t be Downloaded Automatically. You can Update the Windows or Its files manually at least every week or month. Now to update it “Manual“, Perform the following steps;
- Press Window Key and R Simultaneously, to get access to misc on your PC either for Windows 8/8.6 or Windows 10.
- Now, Enter Windows Modules Installer Worker in the search box.
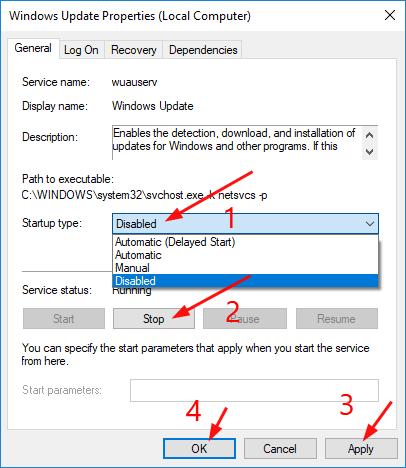
- Then, Click the Windows Modules Installer Worker two times and then select the Manual option from the Dropdown Menu.
- Again Open the misc but now Enter Windows Update in the search box.
- Same Way click the Windows Update two times and choose the Manual option. You can Disable it too.
- After these, all the procedures, Press the Windows Button again and Go to Control Panel.
- In that, click the Windows Update.
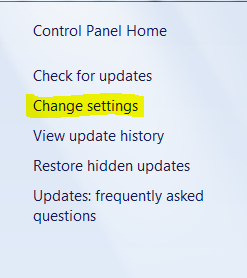
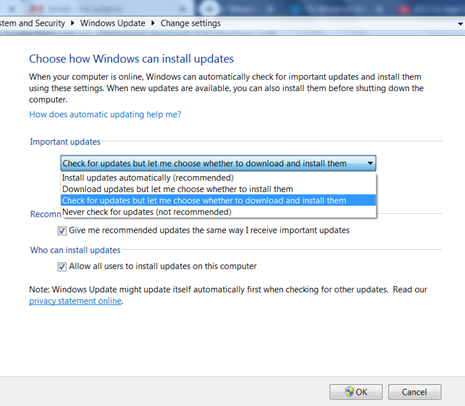
- You will see the Change Setting on the left side of your Windows Update Page.
- Then change it to Check for Updates but let me choose whether to download and install them.
- Now Click OK.
Solution-6: You can use System File Checker Tool to Scan And Fix the Corrupted File
This Issue can occur when some System-related Files that are related to a windows update which is corrupted, and then Your PC may face with high resource usage problem or High CPU Usage Problem. To fix this, use the System File Checker tool to scan the files automatically.
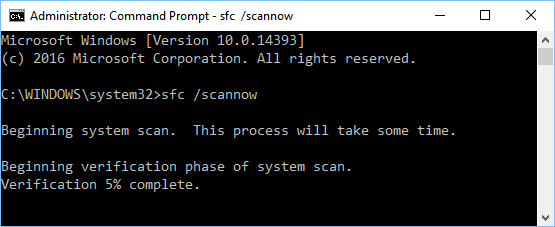
- Press Windows + X to open the Context Menu and then select Command Prompt (Admin) option to open Command Prompt as an Administrator user.
- In the Command Prompt Application, Type the following command to run:
sfc /scannow
Then press the Enter Key.
It will start searching for the corrupted files, broken files, or missing System files on your computer and it will Repair or Replace them if possible. You have to wait until this process completed and then you have to Reboot Your device.
RELATED: Want to Download Latest YouTube Vanced Apk then Checkout the link.
Frequently Asked Questions
-
Can I Stop Windows Modules Installer Worker?
Mostly It is not recommended to stop this Windows Modules Installer Worker, But When the performance of your computer gets decreases, and it becomes a tedious process while working on your PC.So at that time, you can disable the Windows Modules Installer Worker, By following some steps:
- First of all, Press the Ctrl+Shift+Ecs Or Ctrl+Alt+Delete and open the Task Manager.
- Now, Find Windows Modules Installer Worker Process or Find TiWorker.exe on the whole list.
- Final Step is, Right-click on that and in “New Menu” then choose “End Task.”
-
What is Windows Modules Installer Worker Windows 10?
Windows Modules Installer worker is a Service Provided By Windows in Windows 8 or 10 that looks for the New updates in your PC and install them into Your Computer. Most Often It also Resultant in the Slow Performance of computers due to the High Usage of the CPU process. So when you face this kind of situation, then you can follow the steps that are mentioned above in our Article.
-
Is Windows Modules Installer Worker Necessary?
Windows Modules Installer Worker is nothing but a tool that is built-in into the OS of Windows.
This will automatically search for the new updates in your PC and update the System file itself and also fixes the bugs. This process of Windows Modules Installer Worker will automatically run in the background of your computer.
-
How do I Stop the Windows Modules Installer TrustedInstaller Service?
You can do this by Regedit, which will show How can you change the Startup type of Windows Modules Installer Worker from Registry Editor.
To do this, you have to perform the following steps:
- Go to the “Start” button and click on the Search programs and files and Type “regedit” and press the Enter.
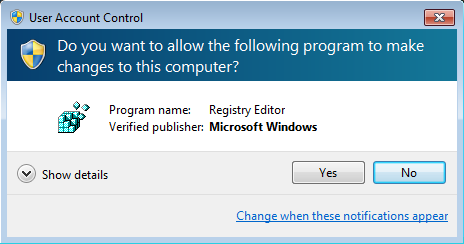
- Then one Pop-up Menu will open, which says YES or NO to the “User Account Control.” Press YES to it.
- Find the path and navigate to the HKEY_LOCAL_MACHINE-SYSTEM -> CurrentControlSet -services -> TrustedInstaller
- Then you will find the “Start” registry key.
- Now, Double click on that “Start” and edit the value;
Automatic – 2
Manual – 3
Disabled – 4
Automatic (Delayed Start) – 2
That’s All!
Conclusion
These are the Effective Methods to fix the Windows Modules Installer Worker high CPU usage error. Hopefully, any one of these methods can help you to fix the error. Now you can easily solve this error of windows Installer worker 100% disk usage, If you need any kind of help from our experts then please let us know in the comment section below. Thank you!










Thank you. Very helpful.